
Next: Critical changes in cells Up: 6.3.4 A Decomposition for Previous: An approximate solution
Figure 6.22b illustrates which values of ![]() produce
collision. We will refer to this representation as a radar map.
The four contact orientations are indicated by the contact feature.
The notation
produce
collision. We will refer to this representation as a radar map.
The four contact orientations are indicated by the contact feature.
The notation ![]() and
and ![]() identifies the two intervals
for which
identifies the two intervals
for which
![]() . Now imagine changing
. Now imagine changing ![]() by
a small amount, to obtain
by
a small amount, to obtain
![]() . How would the radar
map change? The precise angles at which the contacts occur would
change, but the notation
. How would the radar
map change? The precise angles at which the contacts occur would
change, but the notation ![]() and
and ![]() , for
configurations that lie in
, for
configurations that lie in
![]() , remains unchanged. Even though
the angles change, there is no interesting change in terms of the
contacts; therefore, it makes sense to declare
, remains unchanged. Even though
the angles change, there is no interesting change in terms of the
contacts; therefore, it makes sense to declare
![]() and
and
![]() to lie in the same cell in
to lie in the same cell in
![]() because
because
![]() and
and
![]() both place the segment between the same
contacts. Imagine a column of two
both place the segment between the same
contacts. Imagine a column of two ![]() -cells above a small area around
-cells above a small area around
![]() . One
. One ![]() -cell is for orientations in
-cell is for orientations in ![]() , and the
other is for orientations in
, and the
other is for orientations in ![]() . These appear to be 3D
regions in
. These appear to be 3D
regions in
![]() because each of
because each of ![]() ,
, ![]() , and
, and ![]() can be
perturbed a small amount without leaving the cell.
can be
perturbed a small amount without leaving the cell.
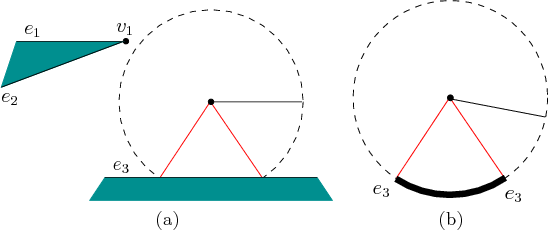 |
Of course, if ![]() is changed enough, then eventually we expect a
dramatic change to occur in the radar map. For example, imagine
is changed enough, then eventually we expect a
dramatic change to occur in the radar map. For example, imagine ![]() is infinitely long, and the
is infinitely long, and the ![]() value is gradually increased in Figure
6.22a. The black band between
value is gradually increased in Figure
6.22a. The black band between ![]() and
and ![]() in Figure
6.22b shrinks in length. Eventually, when the distance
from
in Figure
6.22b shrinks in length. Eventually, when the distance
from
![]() to
to ![]() is greater than the length of
is greater than the length of
![]() , the black band disappears. This situation is shown in Figure
6.23. The change is very important to notice because
after that region vanishes, any orientation
, the black band disappears. This situation is shown in Figure
6.23. The change is very important to notice because
after that region vanishes, any orientation
![]() between
between
![]() and
and ![]() , traveling the long way around the circle, produces a
configuration
, traveling the long way around the circle, produces a
configuration
![]() . This
seems very important because it tells us that we can travel between
the original two cells by moving the robot further way from
. This
seems very important because it tells us that we can travel between
the original two cells by moving the robot further way from ![]() ,
rotating the robot, and then moving back. Now move from the position
shown in Figure 6.23 into the positive
,
rotating the robot, and then moving back. Now move from the position
shown in Figure 6.23 into the positive ![]() direction.
The remaining black band begins to shrink and finally disappears when
the distance to
direction.
The remaining black band begins to shrink and finally disappears when
the distance to ![]() is further than the robot length. This
represents another critical change.
is further than the robot length. This
represents another critical change.
The radar map can be characterized by specifying a circular ordering
Steven M LaValle 2020-08-14